gemellocattivo.com

Which means "Evil Twin". Lets see your projects where you change boring into fun or create the fun from scratch.
It is currently Mon Apr 29, 2024 9:38 am

All times are UTC - 5 hours [ DST ]


Post new topic Reply to topic  [ 2206 posts ]  Go to page Previous  1 ... 93, 94, 95, 96, 97, 98, 99 ... 221  Next
Author Message
PostPosted: Sat Jul 17, 2021 11:36 pm 
Offline

Joined: Sat Jan 03, 2015 10:13 pm
Posts: 794
What epoxy are you using? Is the outside a turned surface? You're not blasting the surface for adhesion? ;)


Top
 Profile Send private message  
 
PostPosted: Sun Jul 18, 2021 7:09 am 
Offline

Joined: Thu Jan 01, 2015 6:47 pm
Posts: 4256
TheDarkSideOfWill wrote:
What epoxy are you using? Is the outside a turned surface? You're not blasting the surface for adhesion? ;)


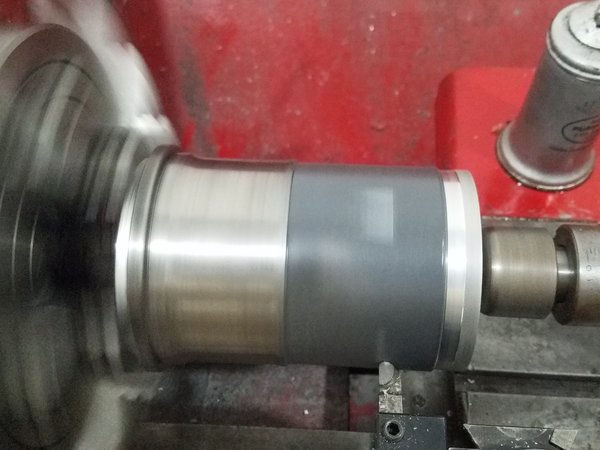
It a few pages back but that is where I left off. The grey stuff is JBweld and yes I was having an adhesion issue....at least when trying to machine it to a 1-2 mill thickness, under about 5 is was just ripping off. I didn't blast but did hit that surface with I think it was 180 grit sandpaper.
Attachment:
20210310_174638-resized-1024.jpg
20210310_174638-resized-1024.jpg [ 188 KiB | Viewed 3576 times ]


So stop and think a bit. What I settled on was to go from a pointed to radius tool bit

Attachment:
20210717_161207-resized-1024.jpg
20210717_161207-resized-1024.jpg [ 264.68 KiB | Viewed 3576 times ]


And than sand to size once it was cut round. That worked out on the 3 that were really bad. The 9 that were mostly good I'll paint with an etching epoxy...pondering sanding the other 3 to maybe 2 under target so I can paint them as well...not sure...The epoxy paint says 2-6mil layer so that alone would more then fix this if I remove all the JBweld,


Top
 Profile Send private message  
 
PostPosted: Sun Jul 18, 2021 9:00 am 
Offline

Joined: Thu Jan 01, 2015 6:47 pm
Posts: 4256
Ok, no jbweld on 9 cylinders, they all measure 3.5705+/-.0005" , JBweld on 3 and they measure 3.571-3.572.  The notes from the 1st machine shop that did the final spigot bores says 3.572, which is why my cylinder drawing is 3.571....but I measure 3.574 at the bottoms and as much as 3.576 at the top (which is really the middle of the cylinder where the o-ring sits)...this is without the mains torqued.  This could be my fault, as that was all welded which makes getting a good machined finish very difficult and I'm sure  I've touch then with sandpaper a couple times to clean them up....which will knock off high spots and easily explain why they are now tapered as its way easier to reach the top part.  I was putting aviation sealant on the o-ring because the 0ring seat surface in the block is made of weld and not perfect and every time I pulled the liners there was sealant between the liner and block no matter how carefully I thought I was being....no doubt this is how it was getting in there.

I'm sure I could put the cylinders in now and the major out of round will be gone but as I said I'm leaning toward coating them all with epoxy paint and bring them to about 3.5735-3.5740 then warm the block up to 200F or so before I drop them in. I'm a little torn though....I could probably find a way to hone the spigots bores straight to about 3.576.....I'll think on this a bit I guess as I don't have any epoxy primer so nothing is happening today anyway.  I'm going to try to use the 6-10am Sat-Sun time when I'm up but the family isn't to keep this moving.

On the lapping bar I really don't have anything on the shelf to attach for the handle so I need to order something...my plan is get the cylinders sorted and in the block then sort the mains and bolt to together.....at least that's the plan.


Top
 Profile Send private message  
 
PostPosted: Tue Jul 20, 2021 7:18 am 
Offline

Joined: Thu Jan 01, 2015 6:47 pm
Posts: 4256
I ran over to the paint store at lunch yesterday to pick up the epoxy.....look at that, its a gym now crying

ordered from Eastwood, will deliver in 2 days. I am a little concerned that its a thermal barrier....but it is only 1-2 mill thick and at least they will be touching now so I'm sure it will be better than it was.


Top
 Profile Send private message  
 
PostPosted: Tue Jul 20, 2021 7:47 am 
Offline

Joined: Sat Jan 03, 2015 10:13 pm
Posts: 794
Meant to post this as well: https://www.mcmaster.com/7633T4/

Edit: Have an oven in your shop? I bake parts I paint with the above at 175* for an hour to cure the epoxy.


Top
 Profile Send private message  
 
PostPosted: Wed Jul 21, 2021 6:21 am 
Offline

Joined: Thu Jan 01, 2015 6:47 pm
Posts: 4256
TheDarkSideOfWill wrote:
Meant to post this as well: https://www.mcmaster.com/7633T4/

Edit: Have an oven in your shop? I bake parts I paint with the above at 175* for an hour to cure the epoxy.


sadly no oven.....hotair gun or heat lambs is all I've got.

I have seem epoxy spray paint and always wondered how the heck 1 part epoxy is possible? I'm not a chemist and not remotely chemically fluent so the answer could be simply and I still wouldn't get it :? The 2 part stuff should be here today but I'm not sure when I can spray them yet...bathroom decisions have been made so that is back to top priority....hopefully over the weekend then give it a week or 2 to dry. I need to get the lapping bar extended and ready to use too so maybe work on that while the paint dies.


Top
 Profile Send private message  
 
PostPosted: Wed Jul 21, 2021 6:54 am 
Offline

Joined: Tue Jan 06, 2015 8:09 am
Posts: 420
You have that big stucco oven. You can just heat them in there. :D

_________________
Wade Williams
Master Ferrari Tech
Restoration Tech
Engine Machinist
Fabricator
Racecar Driver


Top
 Profile Send private message  
 
PostPosted: Wed Jul 21, 2021 7:26 am 
Offline

Joined: Thu Jan 01, 2015 6:47 pm
Posts: 4256
MerlinTech wrote:
You have that big stucco oven. You can just heat them in there. :D


And a grill....using either for car parts is a ummm...costly decision. :shock:

.....no, the plan is to just let them dry naturally while I build a bathroom.

Even on this path though I could be just a few weeks from checking piston valve pockets and returning your vise...its only been a year right? :oops:


Top
 Profile Send private message  
 
PostPosted: Wed Jul 21, 2021 7:50 am 
Offline

Joined: Sat Jan 03, 2015 10:13 pm
Posts: 794
mk e wrote:
MerlinTech wrote:
...its only been a year right? :oops:


That's what I say about the borrowed shop space my car is in..


Top
 Profile Send private message  
 
PostPosted: Wed Jul 21, 2021 7:55 pm 
Offline

Joined: Thu Jan 01, 2015 6:47 pm
Posts: 4256
Paint came.

Attachment:
20210721_193805-resized-1024.jpg
20210721_193805-resized-1024.jpg [ 227.56 KiB | Viewed 3521 times ]


I'm not loving how it sprayed....it doesn't really matter but I don't know if its the paint or my gun or my mixing but the flow valve is full open and its still not flowing well.  There is still paint in the gun so I'm leaning toward another coat knowing I may need to sand but I don't want to set up again so ....


So I open the shop door, started cleaning and taping and a storm rolled in....I was afraid baby would melt....but I think she survived. 

Attachment:
20210721_185903-resized-1024.jpg
20210721_185903-resized-1024.jpg [ 292.08 KiB | Viewed 3521 times ]


Top
 Profile Send private message  
 
Display posts from previous:  Sort by  
Post new topic Reply to topic  [ 2206 posts ]  Go to page Previous  1 ... 93, 94, 95, 96, 97, 98, 99 ... 221  Next

All times are UTC - 5 hours [ DST ]


Who is online

Users browsing this forum: No registered users and 23 guests


You cannot post new topics in this forum
You cannot reply to topics in this forum
You cannot edit your posts in this forum
You cannot delete your posts in this forum
You cannot post attachments in this forum

Jump to:  
Powered by phpBB® Forum Software © phpBB Group